Tutorial
Showcase serverless development in action
Tutorial
This tutorial walks you through developing a simple OpenServerless
application using the Command Line Interface (CLI) and Javascript (but
any supported language will do).
Its purpose is to showcase serverless development in action by creating
a contact form for a website. We will see the development process from
start to finish, including the deployment of the platform and running
the application.
1 - Getting started
Let’s start building a sample application
Getting started
Build a sample Application
Imagine we have a static website and need server logic to store contacts
and validate data. This would require a server, a database and some code
to glue it all together. With a serverless approach, we can just
sprinkle little functions (that we call actions) on top of our static
website and let OpenServerless take care of the rest. No more setting up
VMs, backend web servers, databases, etc.
In this tutorial, we will see how you can take advantage of several
services which are already part of a OpenServerless deployment and
develop a contact form page for users to fill it with their emails and
messages, which are then sent via email to us and stored in a database.
Finally, we’ll see how to activate external services using Web hooks.
Openserverless CLI: Ops
Serverless development is mostly performed on the CLI, and
OpenServerless has its tool called ops. It’s a command line tool that
allows you to deploy (and interact with) the platform seamlessly to the
cloud, locally and in custom environments.
Ops is cross-platform and can be installed on Windows, Linux and MacOS.
You can find the project and the sources on
Apache OpenServerless Cli Github page
Deploy OpenServerless
To start using OpenServerless you can refer to the Installation
Guide. You can follow the local
installation to quickly get started with OpenServerless deployed on your
machine, or if you want to follow the tutorial on a deployment on cloud
you can pick one of the many supported cloud provider. Once installed
come back here!
Enabling Services
After installing OpenServerless on a local machine with Docker or on a
supported cloud, you can enable or disable the services offered by the platform.
As we will use Postgres database, the Static content with the Minio S3 compatible
storage, let’s run in the terminal:
ops config enable --postgres --static --minio --cron
This is the default set of services.
Since you should already have a deployment running, we have to update it
with the new services so they get deployed. Simply run:
And with just that (when it finishes), we have everything we need ready
to use!
💡 NOTE
If you’ve installed the local development environment using the instructions from
the Docker installation page you’ve already
the base services enabled by default.
You can check what services are enabled with the command:
This should be the output:
OPERATOR_COMPONENT_MINIO=true
OPERATOR_COMPONENT_MONGODB=true
OPERATOR_COMPONENT_POSTGRES=true
OPERATOR_COMPONENT_STATIC=true
OPERATOR_COMPONENT_CRON=true
OPERATOR_COMPONENT_REDIS=true
Create a user
If you don’t have a user, it’s the time to create one. We we’ll use it to work on this tutorial.
⚠ WARNING
To create a user, we need to be the administrator, like described in this section.
ops admin adduser opstutorial <youremail> SimplePassword --all
The output will be:
Generated OPSTUTORIAL user secrets.
Creating user opstutorial...
whiskuser.nuvolaris.org/opstutorial created
Login as user
After user creation, it’s time to perform ops login.
💡 NOTE
The ops ide login command will log you in on the server and dump the proper configuration of
active services for your user. The configuration is automatically used by ops for all the tasks.
You only need to run ops ide login once (unless you need to log in to another OpenServerless server or with another
OpenServerless user).
Change your APIHOST accordly, if you’ve specified a custom one during the system setup
ops ide login opstutorial http://localhost:80
*** Configuring Access to OpenServerless ***
apihost=http://localhost:80 username=opstutorial
Logging in http://localhost:80 as opstutorial
Enter Password:
Successfully logged in as opstutorial.
ok: whisk auth set. Run 'wsk property get --auth' to see the new value.
ok: whisk API host set to http://localhost:80
OpenServerless host and auth set successfully. You are now ready to use ops!
Cleaning Up
Once you are done and want to clean the services configuration, just
run:
ops config disable --postgres --static --minio --cron
2 - First steps
Move your first steps on Apache Openserverless
First steps
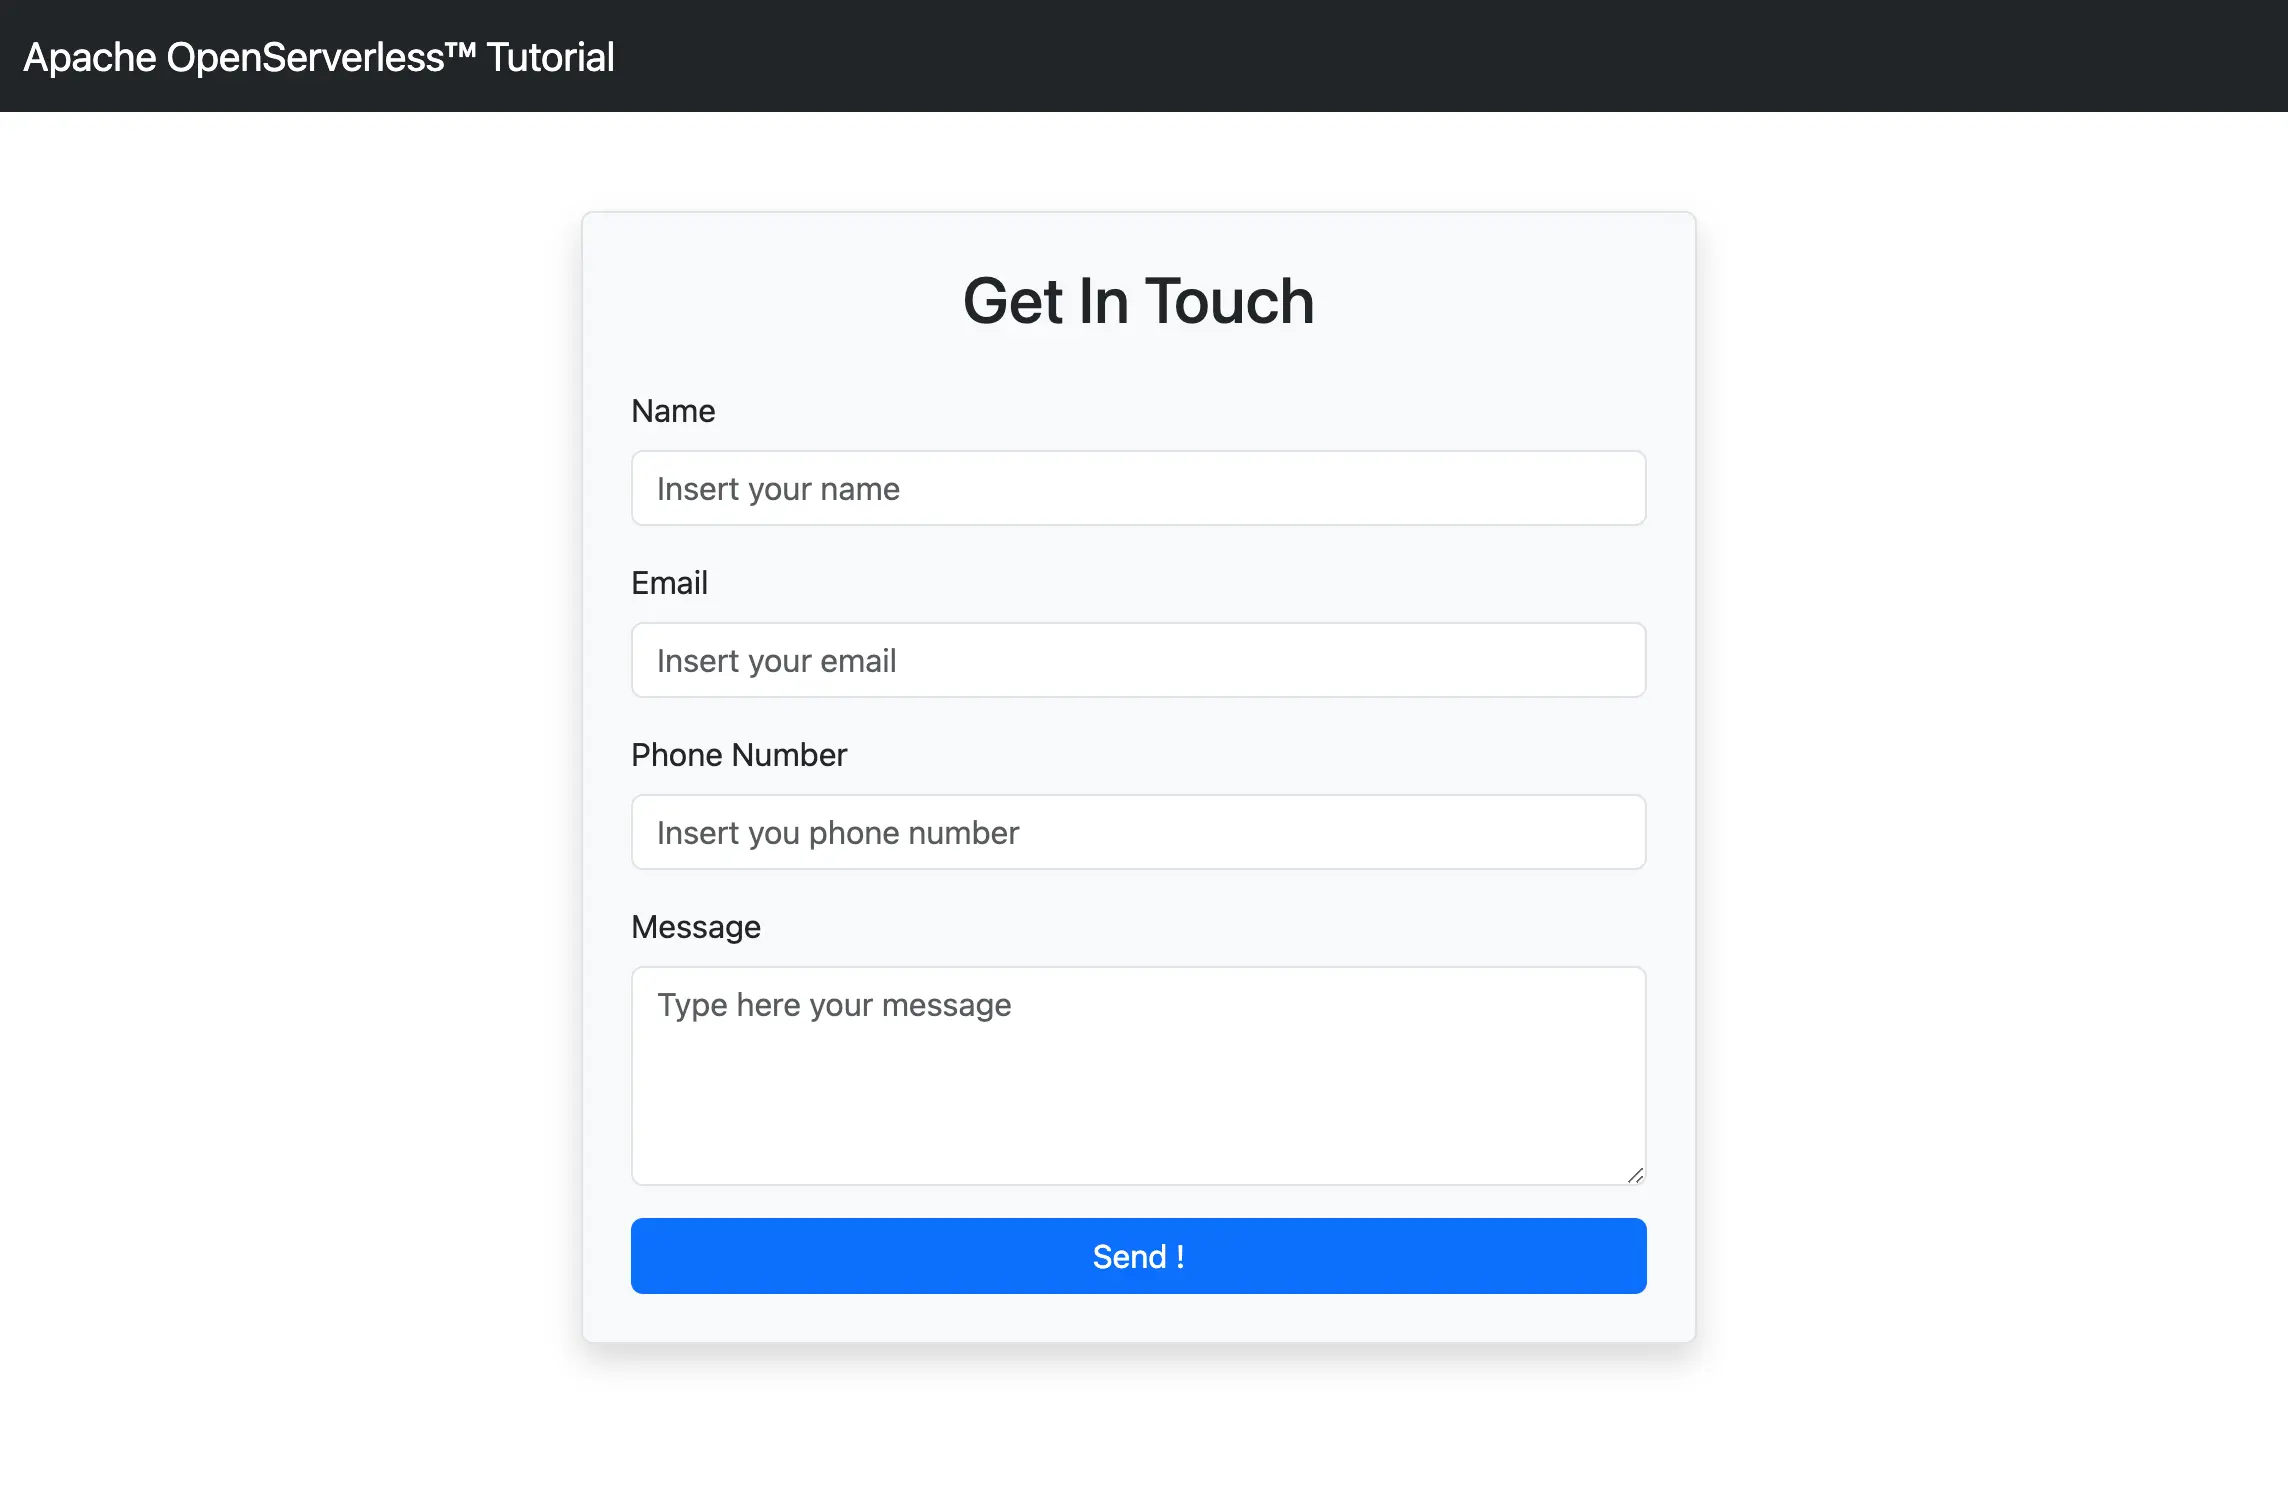
Starting at the Front
Right now, after a fresh installation, and after added the opstutorial user,
if we visit the <apihost> you will see a very simple page with:
Welcome to Nuvolaris static content distributor landing page!!!
That’s because we’ve activated the static content, and by default it
starts with this simple index.html page. We will instead have our own
index page that shows the users a contact form powered by OpenServerless
actions. Let’s write it now.
Let’s create a folder that will contain all of our app code:
contact_us_app.
💡 NOTE
You can find the full source code of the tutorial at this GitHub Repository:
Contact Us App.
The repository has a tag for each step. So after cloning it in your local
directory, follow the istruction on it’s README page.
Inside that create two new folders called web, which will store our static
frontend, and packages, which will store our backend actions.
Inside the web folder an index.html file.
The directory structure should look like:
contact_us_app
├── packages
└── web
    └── index.html
Paste the following markup inside the index.html file:
<!DOCTYPE html>
<html lang="it">
<head>
    <meta charset="UTF-8">
    <meta name="viewport" content="width=device-width, initial-scale=1">
    <title>Get In Touch</title>
    <link href="https://cdn.jsdelivr.net/npm/bootstrap@5.3.3/dist/css/bootstrap.min.css" rel="stylesheet">
</head>
<body>
<nav class="navbar navbar-dark bg-dark">
    <div class="container">
        <a class="navbar-brand" href="#">Apache OpenServerless™ Tutorial</a>
    </div>
</nav>

<div class="container d-flex justify-content-center align-items-center" style="min-height: 80vh;">
    <div class="w-50 p-4 border rounded bg-light shadow">
        <h2 class="text-center mb-4">Get In Touch</h2>
        <form>
            <div class="mb-3">
                <label for="name" class="form-label">Name</label>
                <input type="text" class="form-control" id="name" name="name" placeholder="Insert your name">
            </div>
            <div class="mb-3">
                <label for="email" class="form-label">Email</label>
                <input type="email" class="form-control" id="email" name="email" placeholder="Insert your email">
            </div>
            <div class="mb-3">
                <label for="phone" class="form-label">Phone Number</label>
                <input type="tel" class="form-control" id="phone" name="phone" placeholder="Insert you phone number">
            </div>
            <div class="mb-3">
                <label for="message" class="form-label">Message</label>
                <textarea class="form-control" id="message" name="message" rows="4" placeholder="Type here your message"></textarea>
            </div>
            <button type="submit" class="btn btn-primary w-100">Send !</button>
        </form>
    </div>
</div>

<script src="https://cdn.jsdelivr.net/npm/bootstrap@5.3.3/dist/js/bootstrap.bundle.min.js"></script>
</body>
</html>
⚠ WARNING
Before move on, be sure to have completed once the login
as indicated here
Now we just have to upload it to our OpenServerless deployment. You
could upload it using something like curl with a PUT to where your
platform is deployed at, but there is an handy command that does it
automatically for all files in a folder:
The output will be:
> Scan:
> Deploying:
build process exited with code 0
UPLOAD ASSETS FROM web
==================| UPLOAD RESULTS |==================
| FILES      : 1
| COMPLETED  : 1
| ERRORS     : 0
| SKIPPED    : 0
| EXEC. TIME : 37.83 ms
======================================================
URL: http://opstutorial.localhost:80
The command will scan both packages and web directories and will
upload the index.html to the web bucket. Finally it will show the
URL where the frontend have been published.
If you visit the URL within your browser, you should see
the new index page:
Apache OpenServerless has a set of development tools, inside the ops ide command,
details of which are available in this section of the guide.
As shown before, we will be using ops ide for publishing, as this make the process
quicker and easier.
The command ops ide login will enable the development tools.
3 - Form validation
Learn how to add form validation from front to back-end
The contact form we just uploaded does not do anything. To make it work
let’s start to fill our package directory with backend actions.
We well start to handle the form submission. We can do that by
adding a new action that will be called when the form is submitted.
Let’s create a submit.js file inside our packages/contact folder.
You directory structure should looks like this:
contact_us_app
├── packages
│   └── contact
│       └── submit.js
└── web
    └── index.html
Paste this content inside the submit.js file:
//--web true
//--kind nodejs:default

function main(args) {
    let message = [];
    let errors = [];

    // TODO: Add here Form Validation code

    // TODO: Add here the code for returning the Result
}
This action is a bit more complex. It takes the input object (called
args) which will contain the form data (accessible via args.name,
args.email, etc.). With that. we will do some validation and then
return the result.
💡 NOTE
You may have noticed the strange comments at the beginning of the file. Those
comments are used by ops ide to automatically handle the publishing of files
by calling ops package or ops action as needed.
In particular:
- the
--web true will enable this as a web action; --kind nodejs:default will ask OpenServerless to run this code on the nodejs default runtime.
Validation
Let’s start filling out the “Form Validation” part by checking the name:
// validate the name
if (args.name) {
    message.push("name: " + args.name);
} else {
    errors.push("No name provided");
}
Then the email by using a regular expression:
// validate the email
var re = /\S+@\S+\.\S+/;
if (args.email && re.test(args.email)) {
    message.push("email: " + args.email);
} else {
    errors.push("Email missing or incorrect.");
}
The phone, by checking that it’s at least 10 digits:
// validate the phone
if (args.phone && args.phone.match(/\d/g).length >= 10) {
    message.push("phone: " + args.phone);
} else {
    errors.push("Phone number missing or incorrect.");
}
Finally, the message text, if present:
// validate the message
if (args.message) {
    message.push("message:" + args.message);
}
Submission
With the validation phase, we added to the “errors” array all the errors
we found, and to the “message” array all the data we want to show to the
user. So if there are errors, we have to show them, otherwise, we store
the message and return a “thank you” page.
// return the result
if (errors.length) {
    var errs = "<ul><li>" + errors.join("</li><li>") + "</li></ul>";
    return {
        body: "<h1>Errors!</h1>" +
            errs + '<br><a href="javascript:window.history.back()">Back</a>'
    };
} else {
    var data = "<pre>" + message.join("\n") + "</pre>";
    return {
        body: "<h1>Thank you!</h1>" + data,
        name: args.name,
        email: args.email,
        phone: args.phone,
        message: args.message
    };
}
Note how this action is returning HTML code. Actions can return a
{ body: <html> } kind of response and have their own url so they can
be invoked via a browser and display some content.
The HTML code to display is always returned in the body field, but we
can also return other stuff. In this case we added a a field for each of
the form fields. This gives us the possibility to invoke in a sequence
another action that can act just on those fields to store the data in
the database.
Let’s start deploying the action:
You should see output like this:
/home/openserverless/.ops/tmp/deploy.pid
PID 70925
> Scan:
>> Action: packages/contact/submit.js
> Deploying:
>> Package: contact
$ $OPS package update contact
ok: updated package contact
>>> Action: packages/contact/submit.js
$ $OPS action update contact/submit packages/contact/submit.js --web true --kind python:default --param POSTGRES_URL $POSTGRES_URL
ok: updated action contact/submit
build process exited with code 0
UPLOAD ASSETS FROM web
==================| UPLOAD RESULTS |==================
| FILES      : 1
| COMPLETED  : 1
| ERRORS     : 0
| SKIPPED    : 0
| EXEC. TIME : 40.76 ms
======================================================
URL: http://opstutorial.localhost:80
You can retrieve the url of the action with:
You should see this output:
ok: got action submit
http://localhost:80/api/v1/web/opstutorial/contact/submit
If you click on it you will see the Error page with a list of errors,
that’s because we just invoked the submit logic for the contact form
directly, without passing in any args. This is meant to be used via the
contact form page!
We need to wire it into the index.html. So let’s open it again and add a
couple of attributes to the form. Change the <form> tag as follow:
<form method="POST" action="/api/v1/web/opstutorial/contact/submit"
      enctype="application/x-www-form-urlencoded">
Upload the web folder again with the new changes:
Now if you go to the contact form page the send button should work. It
will invoke the submit action which in turn will return some html.
If you fill it correctly, you should see the “Thank you” page.
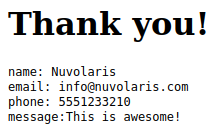
Note how only the HTML from the body field is displayed, the other
fields are ignored in this case.
The ops action command can be used for many more things besides
creating actions. For example, you can use it to list all available
actions:
actions
/opstutorial/contact/submit                 private nodejs:21
And you can also get info on a specific action:
ops action get contact/submit
ok: got action contact/submit
{
    "namespace": "opstutorial/contact",
    "name": "submit",
    "version": "0.0.1",
    "exec": {
        "kind": "nodejs:21",
        "binary": false
    },
    "annotations": [
        {
            "key": "web-export",
            "value": true
        },
        {
            "key": "raw-http",
            "value": false
        },
        {
            "key": "final",
            "value": true
        },
        {
            "key": "provide-api-key",
            "value": false
        },
        {
            "key": "exec",
            "value": "nodejs:21"
        }
    ],
    "parameters": [
        {
            "key": "POSTGRES_URL",
            "value": "postgresql://opstutorial:<password>@nuvolaris-postgres.nuvolaris.svc.cluster.local:5432/opstutorial"
        }
    ],
    ...
}
These commands can come in handy when you need to debug your actions.
Here is the complete the submit.js action:
//--web true
//--kind nodejs:default

function main(args) {
    let message = [];
    let errors = [];

    // validate the name
    if (args.name) {
        message.push("name: " + args.name)
    } else {
        errors.push("No name provided")
    }

    // validate the email
    var re = /\S+@\S+\.\S+/;
    if (args.email && re.test(args.email)) {
        message.push("email: " + args.email);
    } else {
        errors.push("Email missing or incorrect.");
    }

    // validate the phone
    if (args.phone && args.phone.match(/\d/g).length >= 10) {
        message.push("phone: " + args.phone);
    } else {
        errors.push("Phone number missing or incorrect.");
    }

    // validate the message
    if (args.message) {
        message.push("message:" + args.message);
    }

    // return the result
    if (errors.length) {
        var errs = "<ul><li>" + errors.join("</li><li>") + "</li></ul>";
        return {
            body: "<h1>Errors!</h1>" +
                errs + '<br><a href="javascript:window.history.back()">Back</a>'
        };
    } else {
        var data = "<pre>" + message.join("\n") + "</pre>";
        return {
            body: "<h1>Thank you!</h1>" + data,
            name: args.name,
            email: args.email,
            phone: args.phone,
            message: args.message
        };
    }
}
4 - Use database
Store data into a relational database
Use database
Storing the Message in the Database
We are ready to use the database that we enabled at the beginning of the
tutorial.
Usually, when working with relational databases, the best choice is to use a
schema migration system.
In our case, to keep things simple, we will emulate a migration using an action.
Now, we need to create a table to store the contact data: start by creating a
new action called create-table.js in the packages/contact folder.
The directory structure have to be like this:
contact_us_app
├── packages
│   └── contact
│       ├── create-table.js
│       └── submit.js
└── web
    └── index.html
Put this content inside the create-table.js file:
//--kind nodejs:default
//--param POSTGRES_URL $POSTGRES_URL

const { Client } = require('pg')

async function main(args) {
    console.log('Starting create-table action')
    const client = new Client({ connectionString: args.POSTGRES_URL });

    const createSchema = `CREATE SCHEMA IF NOT EXISTS demo;`

    const createTable = `
    CREATE TABLE IF NOT EXISTS demo.contacts (
        id serial PRIMARY KEY,
        name varchar(50),
        email varchar(50),
        phone varchar(50),
        message varchar(300)
    );
    `

    try {
        console.log(`Connecting to ${args.POSTGRES_URL}`);
        await client.connect();
        console.log('Connected to database');
        await client.query(createSchema);
        console.log('Schema demo created');
        await client.query(createTable);
        console.log('Contact table created');
        return { result: 'OK' };
    } catch (e) {
        if (e instanceof AggregateError) {
            for (const err of e.errors) {
                console.error('[ERROR] - ', err.message || err);
            }
        } else if (e instanceof Error) {
            console.error('[ERROR]  - ', e.message);
        } else {
            console.error('[ERROR] - ', e);
        }
        return { result: 'ERROR' };
    } finally {
        console.log('Closing connection');
        if (client) {
            await client.end();
        }
    }
}
💡 NOTE
You may have noticed here again the comments on top of the file. As said before,
these comments are used by ops ide to automatically handle the publishing of files
by calling ops package or ops action as needed.
In particular:
--kind nodejs:default will ask OpenServerless to run this code on the nodejs default runtime.- the
--param POSTGRES_URL $POSTGRES_URL will automatically fill in the parameters required by the action,
taking it's value from ops's configuration file.
The action is idempotent, so you
may call the action multiple times, but the schema and the table is created only
once.
You can deploy this action using ops ide deploy command.
The output will be like:
/home/openserverless/.ops/tmp/deploy.pid
PID 52906
> Scan:
>> Action: packages/contact/create-table.js
>> Action: packages/contact/submit.js
> Deploying:
>> Package: contact
$ $OPS package update contact
ok: updated package contact
>>> Action: packages/contact/create-table.js
$ $OPS action update contact/create-table packages/contact/create-table.js --kind nodejs:default --param POSTGRES_URL $POSTGRES_URL
ok: updated action contact/create-table
>>> Action: packages/contact/submit.js
$ $OPS action update contact/submit packages/contact/submit.js --web true --kind nodejs:default
ok: updated action contact/submit
build process exited with code 0
UPLOAD ASSETS FROM web
==================| UPLOAD RESULTS |==================
| FILES      : 1
| COMPLETED  : 1
| ERRORS     : 0
| SKIPPED    : 0
| EXEC. TIME : 28.37 ms
======================================================
URL: http://opstutorial.localhost:80
In OpenServerless an action invocation is called an activation. You
can keep track, retrieve information and check logs from an action with
ops activation. For example, with:
You can retrieve the list of invocations. For caching reasons the first
time you run the command the list might be empty. Just run it again and
you will see the latest invocations (probably some hello actions from
the deployment).
If we want to invoke the create-table action, we can do it with
this command.
ops action invoke contact/create-table
The output will be like:
ok: invoked /_/contact/create-table with id e67a6c6f5a9c4667ba6c6f5a9c46675b
The activation will return an id: in our case the id is e67a6c6f5a9c4667ba6c6f5a9c46675b.
You can retrieve the activation log with the command ops activation logs <id> or ops activation logs --last to retrieve
the last activation log.
ops activation logs e67a6c6f5a9c4667ba6c6f5a9c46675b
2025-03-17T23:28:03.390748125Z stdout: Starting create-table action
2025-03-17T23:28:03.391745125Z stdout: Connecting to postgresql://opstutorial:password@nuvolaris-postgres.nuvolaris.svc.cluster.local:5432/opstutorial
2025-03-17T23:28:03.405132167Z stdout: Connected to database
2025-03-17T23:28:03.406006792Z stdout: Schema demo created
2025-03-17T23:28:03.406601042Z stdout: Contact table created
2025-03-17T23:28:03.406604209Z stdout: Closing connection
..
We could run ops activation poll or ops ide poll to listen for new logs.
To check that the table is really there, and inspect it’s schema you can
use the ops devel psql describe tool:
ops devel psql describe "demo.contacts" --format=table
You should see:
┌───┬───────────────┬──────────────┬─────────────┬───────────────────┬─────────────┐
│   │ table_catalog │ table_schema │ column_name │ data_type         │ is_nullable │
├───┼───────────────┼──────────────┼─────────────┼───────────────────┼─────────────┤
│ 0 │ opstutorial   │ demo         │ id          │ integer           │ NO          │
│ 1 │ opstutorial   │ demo         │ name        │ character varying │ YES         │
│ 2 │ opstutorial   │ demo         │ email       │ character varying │ YES         │
│ 3 │ opstutorial   │ demo         │ phone       │ character varying │ YES         │
│ 4 │ opstutorial   │ demo         │ message     │ character varying │ YES         │
└───┴───────────────┴──────────────┴─────────────┴───────────────────┴─────────────┘
The Action to Store the Data
We could just write the code to insert data into the table in the
submit.js action, but it’s better to have a separate action for that.
Let’s create a new file called write.js in the packages/contact
folder:
// write.js

//--kind nodejs:default
//--param POSTGRES_URL $POSTGRES_URL

const {Client} = require('pg')

async function main(args) {
    const client = new Client({connectionString: args.POSTGRES_URL});

    // Connect to database server
    await client.connect();

    const {name, email, phone, message} = args;

    try {
        let res = await client.query(
            'INSERT INTO demo.contacts(name,email,phone,message) VALUES($1,$2,$3,$4)',
            [name, email, phone, message]
        );
        console.log(res);
    } catch (e) {
        console.log(e);
        throw e;
    } finally {
        client.end();
    }

    return {
        body: args.body,
        name,
        email,
        phone,
        message
    };
}
Very similar to the create table action, but this time we are inserting
data into the table by passing the values as parameters. There is also a
console.log on the response in case we want to check some logs again.
Let’s deploy it:
/home/openserverless/.ops/tmp/deploy.pid
/Users/bruno/.ops/tmp/deploy.pid
PID 57700
> Scan:
>> Action: packages/contact/write.js
>> Action: packages/contact/create-table.js
>> Action: packages/contact/submit.js
> Deploying:
>> Package: contact
$ $OPS package update contact
ok: updated package contact
>>> Action: packages/contact/write.js
$ $OPS action update contact/write packages/contact/write.js --kind nodejs:default --param POSTGRES_URL $POSTGRES_URL
ok: updated action contact/write
>>> Action: packages/contact/create-table.js
$ $OPS action update contact/create-table packages/contact/create-table.js --kind nodejs:default --param POSTGRES_URL $POSTGRES_URL
ok: updated action contact/create-table
>>> Action: packages/contact/submit.js
$ $OPS action update contact/submit packages/contact/submit.js --web true --kind nodejs:default
ok: updated action contact/submit
build process exited with code 0
UPLOAD ASSETS FROM web
==================| UPLOAD RESULTS |==================
| FILES      : 1
| COMPLETED  : 1
| ERRORS     : 0
| SKIPPED    : 0
| EXEC. TIME : 28.92 ms
======================================================
URL: http://opstutorial.localhost:80
Finalizing the Submit
Alright, we are almost done. We just need to create a pipeline of
submit → write actions. The submit action returns the 4 form
fields together with the HTML body. The write action expects those 4
fields to store them. Let’s put them together into a sequence:
ops action create contact/submit-write --sequence contact/submit,contact/write --web true
ok: created action contact/submit-write
With this command we created a new action called submit-write that is
a sequence of submit and write. This means that OpenServerless will
call in a sequence submit first, then get its output and use it as
input to call write.
Now the pipeline is complete, and we can test it by submitting the form
again. This time the data will be stored in the database.
Note that write passes on the HTML body so we can still see the thank
you message. If we want to hide it, we can just remove the body
property from the return value of write. We are still returning the
other 4 fields, so another action can use them (spoiler: it will happen
next chapter).
Let’s check out again the action list:
actions
/opstutorial/contact/submit-write                                      private sequence
/opstutorial/contact/submit                                            private nodejs:21
/opstutorial/contact/create-table                                      private nodejs:21
/opstutorial/contact/write                                             private nodejs:21
You probably have something similar. Note the submit-write is managed as
an action, but it’s actually a sequence of 2 actions. This is a very
powerful feature of OpenServerless, as it allows you to create complex
pipelines of actions that can be managed as a single unit.
Trying the Sequence
As before, we have to update our index.html to use the new action.
First let’s get the URL of the submit-write action:
ops url contact/submit-write
<apihost>/api/v1/web/openserverless/contact/submit-write
Then we can update the index.html file. Change the form submit
action with the url from the previous command:
<form method="POST" action="/api/v1/web/opstutorial/contact/submit-write"
          enctype="application/x-www-form-urlencoded">
We just need to add -write to the action name.
Now give a ops ide deploy to publish all the modifications.
Try again to fill the contact form (with correct data) and submit it.
This time the data will be stored in the database.
View data from db
If you want to retrieve data from your database, ops provides several
utilities under the ops devel command. They are useful to interact
with the integrated services, such as the database we are using.
For instance, to interact with PostgreSQL database, let’s run:
echo "SELECT * FROM demo.CONTACTS" | ops devel psql sql --format=table
You should see an output like this:
┌───┬────┬────────────────┬─────────────────────────┬─────────────┬──────────────────────────────┐
│   │ id │ name           │ email                   │ phone       │ message                      │
├───┼────┼────────────────┼─────────────────────────┼─────────────┼──────────────────────────────┤
│ 0 │ 1  │ OpenServerless │ user@openserverless.dev │ 39123123123 │ Hello Apache OpenServerless! │
└───┴────┴────────────────┴─────────────────────────┴─────────────┴──────────────────────────────┘
5 - Sending notifications
Sending notifications on user interaction
Sending notifications
It would be great if we receive a notification when a user tries to
contact us.
For this tutorial we will use a free service that instantly generates
a unique URL through which you can receive and view webhook payloads in
real time.
💡 NOTE
You could replace this service with a workflow automation system, with
your CRM webhook, with Slack hooks etc.
By navigating to the site https://webhook.site/ you will receive a unique
url, as in the image below:
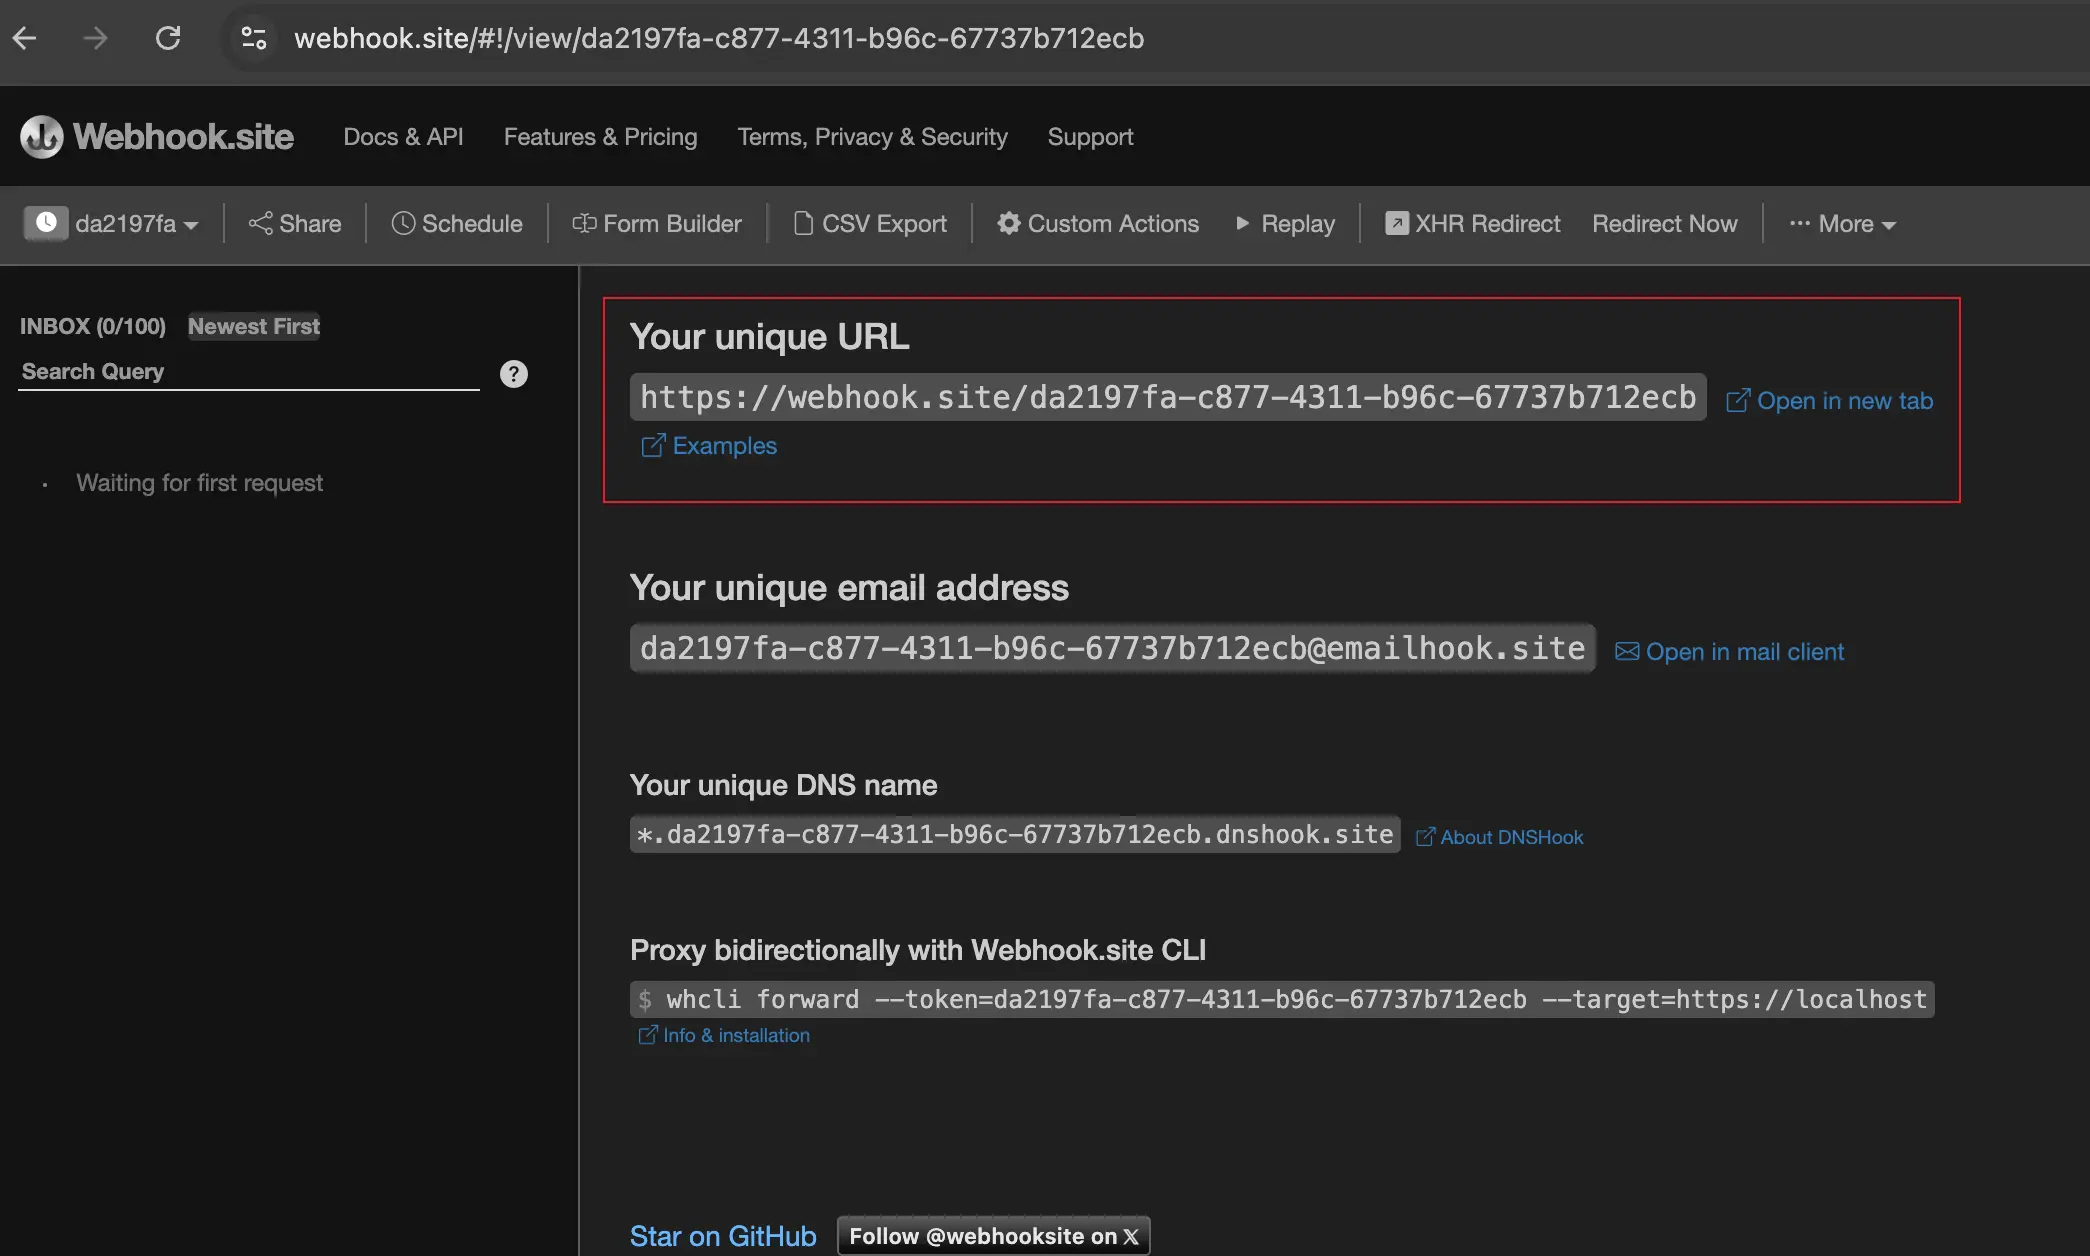
Take note of the url under the “Your unique URL” title.
Once we have a webhook we can proceed to create a new action called notify.js
(in the packages/contact folder).
The directory structure will be:
contact_us_app
├── packages
│   └── contact
│       ├── create-table.js
│       ├── notify.js
│       ├── submit.js
│       └── write.js
└── web
└── index.html
Place this content inside the notify.js file:
// notify.js

//--param NOTIFICATION_URL $NOTIFICATION_URL

function main(args) {
    const { name, email, phone, message } = args;

    const subject = `New contact request from Apache OpenServerless`;
    const payload = {
        subject,
        name,
        email,
        phone,
        message,
    };

    console.log("Built message", payload);

    return fetch(args.NOTIFICATION_URL, {
        method: 'POST',
        headers: {
            'Content-Type': 'application/json',
        },
        body: JSON.stringify(payload),
    })
        .then(response => {
            if (!response.ok) {
                console.log("Error sending message. Status code:", response.status);
            } else {
                console.log("Message sent successfully");
            }
            return {
                body: args.body,
            };
        })
        .catch(error => {
            console.log("Error sending message", error);
            return {
                body: error,
            };
        });
}
💡 NOTE
In this case, we don’t need to annotate the action as web. This because this action will
be invoked in a sequence: so it’s an internal action and is not exposed as an api.
This action has the args.NOTIFICATION_URL parameter, which is the
webhook. It also has the usual 4 form fields parameters that receives in
input, used to build the text of the message. The action will return the
body of the response from the webhook.
The NOTIFICATION_URL may contains different values between a development environment
and a production one.
No problem! Apache OpenServerless deployer supports .env file.
Create a .env file under the package directory.
The directory structure now will look like:
contact_us_app
├── packages
│   ├── .env
│   └── contact
│       ├── create-table.js
│       ├── notify.js
│       ├── submit.js
│       └── write.js
└── web
└── index.html
Inside the .env file put this content:
Replace <url> with the url received from webhook.site.
Now deploy everything as usual, giving:
Creating Another Action Sequence
We have developed an action that can send a message as a
standalone action, but we designed it to take the output of the submit
action and return it as is. Time to extend the previous sequence!
Note that it will send messages for every submission, even for incorrect
inputs, so we will know if someone is trying to use the form without
providing all the information. But we will only store the fully
validated data in the database.
Let’s create the sequence, and then test it:
ops action create contact/submit-notify --sequence contact/submit-write,contact/notify --web true
You should see this output:
ok: created action contact/submit-notify
We just created a new sequence submit-notify from the previous
sequence submit-write and the new notify.
If you want to get more info about this sequence, you can use the
ops action get command:
ops action get contact/submit-notify
You should see this output:
{
    "namespace": "openserverless/contact",
    "name": "submit-notify",
    "version": "0.0.1",
    "exec": {
        "kind": "sequence",
        "components": [
            "/openserverless/contact/submit-write",
            "/openserverless/contact/notify"
        ]
    },
    ...
}
See how the exec key has a kind of sequence and a list of
components that are the actions that compose the sequence.
Now to start using this sequence instead of using the submit action, we
need to update the web/index.html page to invoke the new sequence.
As before let’s grab the url:
ops url contact/submit-notify
<apihost>/api/v1/web/openserverless/contact/submit-notify
And update the action inside the file web/index.html:
<form method="POST" action="/api/v1/web/opstutorial/contact/submit-notify"
    enctype="application/x-www-form-urlencoded">
Don’t forget to re-publish everything with ops ide deploy.
Now try to fill out the form again and press send! It will execute the sequence
and you will receive the message piped from action /contact/submit-write to
/contact/notify.
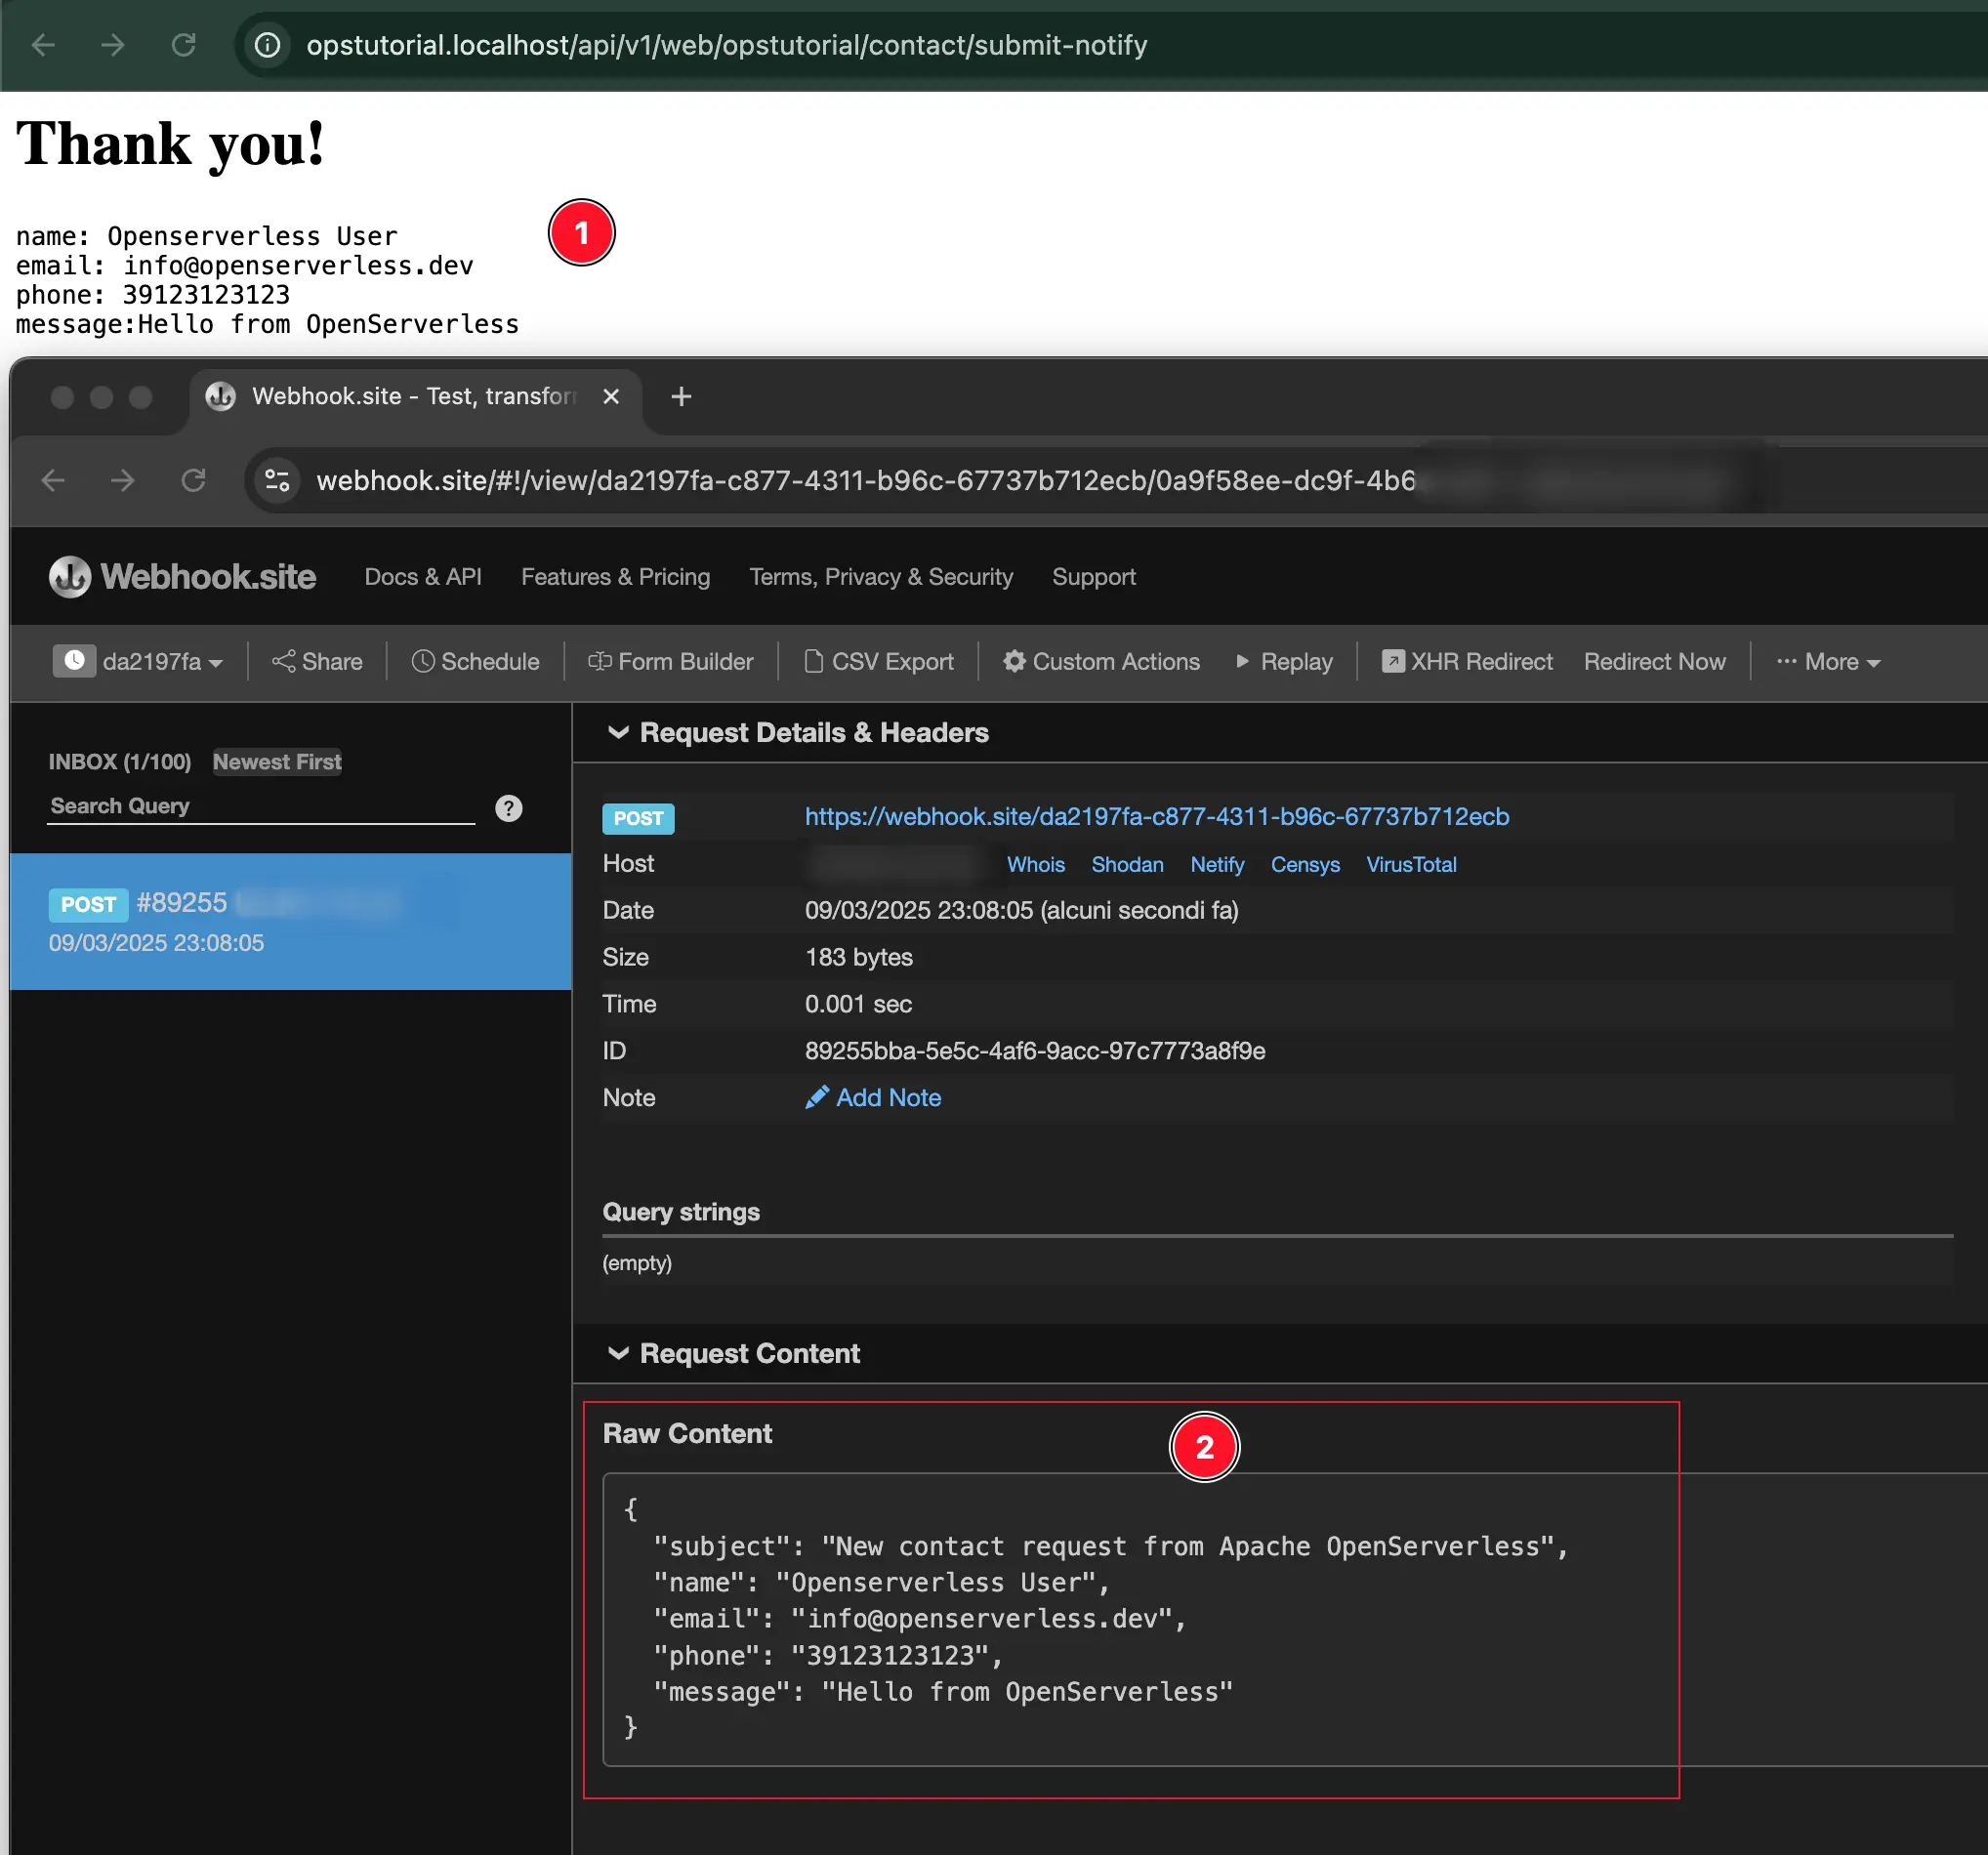
The tutorial introduced you to some utilities to retrieve information
and to the concept of activation. Let’s use some more commands to
check out the logs and see if the message was really sent.
The easiest way to check for all the activations that happen in this app
with all their logs is:
ops activation poll

Enter Ctrl-c to exit.
Polling for activation logs
This command polls continuously for log messages. If you go ahead and
submit a message in the app, all the actions will show up here together
with their log messages.
To also check if there are some problems with your actions, run a couple
of times ops activation list and check the Status of the
activations. If you see some developer error or any other errors, just
grab the activation ID and run ops logs <activation ID>.
6 - App Deployment
Learn how to deploy your app on Apache Openserverless
App Deployment
Deploy
Apache OpenServerless makes publishing a project a very simple operation. The project, organized in two main folders packages for the backend and web for the frontend, can be published immediately using the command ops ide deploy.
Once launched, the command takes care of:
- creating the packages
- preparing the actions with the relative dependencies
- publishing the actions
Through the use of files according to the OpenWhisk manifests.yml standard, it is also possible to publish sequences, triggers and much more at the same time.
💡 NOTE
An OpenWhisk’s manifest file can be useful to automate the deploy of sequences, triggers, rules. Action and packages are simpler to deploy using ops ide deploy
The ops ide deploy command also takes care of managing the parameters inserted in the annotations and injecting the variables from the configuration or from the .env file located in the packages folder.
Packaging the App
Even if not necessary, we’ll package both actions and sequences.
Let’s create, inside the packages folder, two files:
- 01-actions.yaml
- 02-sequences.yaml
We’ll do so, because actions are required to deploy sequences.
The directory structure should be like this:
contact_us_app
├── packages
│   ├── 01-actions.yaml
│   ├── 02-sequences.yaml
│   └── contact
│       ├── create-table.js
│       ├── notify.js
│       ├── submit.js
│       └── write.js
└── web
    └── index.html
The Action Manifest File
Inside the 01-actions.yaml put this content:
packages:
  contact:
    inputs:
      POSTGRES_URL:
        type: string
        value: $POSTGRES_URL

    actions:
      submit:
        function: contact/submit.js
        web: true

      write:
        function: contact/write.js
        web: true

      notify:
        function: contact/notify.js
        web: true
        inputs:
          NOTIFICATION_URL:
            type: string
            value: $NOTIFICATION_URL

      create-table:
        function: contact/create-table.js
At the top level we have the standard packages keyword, under which
we can define the packages we want.
Until now we created all of our actions in the contact package so we
add it under packages.
Then under each package, the actions keyword is needed so we can add
our action custom names with the path to the code (with function).
Finally we also add web: true which is equivalent to --web true when
creating the action manually.
Finally we used the inputs keyword to define the parameters to inject
in the function.
This file will be automatically deployed by the ops ide deploy
command.
The Sequences Manifest File
Inside the 01-actions.yaml put this content:
packages:
  contact:
    sequences:
      submit-write:
        actions: submit, write
        web: true
      submit-notify:
        actions: submit-write, notify
        web: true
At the top level we define the packages keyword and immediately after,
the contact package.
We just have to add the sequences key at the contact level and define the sequences we want with the available actions.
Also this file will be automatically deployed by the ops ide deploy
command.
Test the deploy
To test the deploy, let’s run again the command ops ide deploy:
/Users/openserverless/.ops/tmp/deploy.pid
PID 28177
> Scan:
>> Action: packages/contact/write.js
>> Action: packages/contact/create-table.js
>> Action: packages/contact/submit.js
>> Action: packages/contact/notify.js
> Deploying:
>> Package: contact
$ $OPS package update contact
ok: updated package contact
>>> Action: packages/contact/write.js
$ $OPS action update contact/write packages/contact/write.js --kind nodejs:default --param POSTGRES_URL $POSTGRES_URL
ok: updated action contact/write
>>> Action: packages/contact/create-table.js
$ $OPS action update contact/create-table packages/contact/create-table.js --kind nodejs:default --param POSTGRES_URL $POSTGRES_URL
ok: updated action contact/create-table
>>> Action: packages/contact/submit.js
$ $OPS action update contact/submit packages/contact/submit.js --web true --kind nodejs:default
ok: updated action contact/submit
>>> Action: packages/contact/notify.js
$ $OPS action update contact/notify packages/contact/notify.js --param NOTIFICATION_URL $NOTIFICATION_URL
ok: updated action contact/notify
Found packages .env file. Reading it
>>> Manifest: packages/01-actions.yaml
$ $OPS -wsk project deploy --manifest packages/01-actions.yaml
Success: Deployment completed successfully.
>>> Manifest: packages/02-sequences.yaml
$ $OPS -wsk project deploy --manifest packages/02-sequences.yaml
Success: Deployment completed successfully.
build process exited with code 0
UPLOAD ASSETS FROM web
==================| UPLOAD RESULTS |==================
| FILES      : 1
| COMPLETED  : 1
| ERRORS     : 0
| SKIPPED    : 0
| EXEC. TIME : 35.72 ms
======================================================
URL: http://opstutorial.localhost:80
As you can see, after deploying the actions, the deployer will find
the manifest files and deploy them in lexicographic order.
7 - Conclusions
Let’s continue our journey
Summarizing what we have seen so far, in this tutorial we have seen how to:
- set up an application;
- create and publish the frontend
- create and publish the backend, in the form of packages and actions;
- interact with services using the
ops utility; - publish the application and distribute it on test and production environments.
At this point, all you have to do is give space to your developer imagination and create your applications by taking advantage of the flexibility and scalability of Apache OpenServerless.
If you have questions or need support, reach us through: